04_How to set up Raspberry Pi and use it with Ambisonics (last update September 2023):
*This section is constantly changing as new versions of Raspberry Pi OS are released and needs to be kept up to date to address any compatibility issues that may arise. Please contact me and let me know if any of the processes described here no longer work.
Required material:
- Raspberry Pi 4 (preferably the 8Gb version)
- Raspberry Pi’s power supply
- microSD card and its SD adaptor (32Gb will do)
- USB keyboard and mouse
- LCD screen with HDMI connection
- Audio-Injector Octo RCA sound card.
- Another computer (in this example we are using a Macbook Pro)
Basic Configuration and Network preferences:
Our first step will be to install the Raspberry Pi Operating System onto our SD card. To do this, we need to use the Raspberry Pi Imager, which is an etcher that already contains all the different versions of the OS that we might need.
Here we can download the imager on our mac
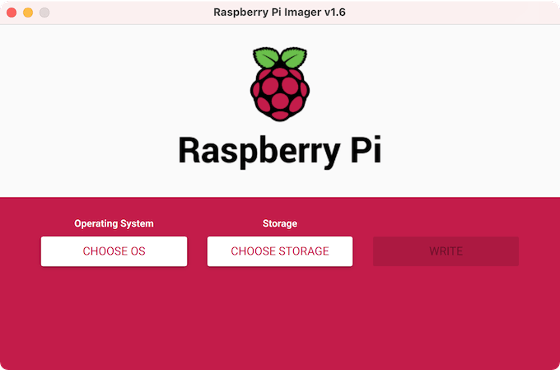
With the microSD card inserted in our computer, we can now start the imager. Installing the operating system only requires three steps: we have to choose the operating system (the default and recommended system is Raspberry Pi 32bit, but I chose to install the 64bit version to avoid future compatibility problems with some objects I will need in Pure Data). Once we have chosen the operating system, we can select the storage that will be the destination of our installation, our microSD, and then simply click on Write. The installation process will run and once it is finished we can disconnect the SD from the computer, extract the microSD, insert it into our Raspberry Pi and start booting.
With a mouse, keyboard and screen connected to our Raspberry Pi, and our OS installed on our microSD, we can finally plug the power supply into the board's USB-C port and it will automatically boot. The initial setup is very straightforward, the OS will ask you to provide some information about the country and language, to determine the keyboard layout and the time zone, and will ask you to set your username and password. As with September 2023, we strongly recommend that you stick with the original username pi when setting up your Raspberry Pi for this project. This is due to a known bug in the Audio-Injector Octo installer file that does not find certain directories if the user is named differently. This may be fixed in future versions of the installer file.
The first time it boots up, Raspberry Pi will also try to connect to an Internet network. This is a fairly straightforward process, and all you need to do is select the network and enter your password. However, if you are somewhere with WPA enterprise networks (Eduroam, WLan), these networks will be unavailable at this stage, and even when we finally see our desktop, they will appear greyed out in the Wi-Fi pop-up menu at the top right of the screen.

To enable Raspberry Pi to connect to these networks, we need to replace the simple network service used by default with the standard Linux Network Manager. We still need to download Network Manager first, so let's connect our Raspberry Pi to any available non-WPA connection (even tethering from a smartphone will do), open a terminal and use the following command lines to download and install Network Manager:
sudo apt install network-manager network-manager-gnome
sudo systemctl disable --now dhcpcd
sudo systemctl enable --now NetworkManager
sudo reboot
After the reboot we will see the original network icon, now with two red X's and a new icon with two computers. This is our network manager and we can use it to connect to any network.
Now we can download and install the latest updates and upgrades for the Raspberry OS, we can do it from the terminal typing the following command lines:
sudo apt-get upgrade
sudo apt-get update
both commands take some time to be completed and at the end of the process we will reboot our system using the command line:
sudo reboot
Enabling VNC and SSH:
Now we are going to enable VNC and SSH. VNC is useful because it allows us to control our Raspberry Pi from our computer if we need to. SSH allows us to access files on our Raspberry Pi. To enable it, simply go to Raspberry > Preferences > Raspberry Pi Configuration. From the Interfaces tab, select VNC and SSH. The VNC logo should appear along with the network icons. If we right click on the icon and select Options, we can select the security protocol to access the VNC. In the Authentication box we will select the VNC password. Then we will go to the Users & Permissions tab to select the password by clicking on Default User and the Password button. When selecting the password, after selecting the authentication method, remember to tick the box "Allow connections from legacy VNC Viewer users". You should now be able to control your Raspberry Pi from your own computer. In my case, using a Macbook Pro, I use an application called Screen Sharing and type in the IP address of my Raspberry Pi. The address can be found in the Network menu > Advanced Options > Connection Information > IP Address.
sudo apt-get install samba samba-common-bin
After the installation, we need to edit the configuration file to make sure we can write to the drive. To do this we will use the following command line:
sudo nano /etc/samba/smb.conf
Inside the configuration file, we need to find the following command:
# By default, the home directories are exported read-only. Change the next parameter to ‘no’ if you want to be able to write to them.
Read only = yes
There we replace 'yes' with 'no' and save the changes with Ctrl+X > Y > Enter.
We also need to set a username and password for Samba, using the following command line
sudo smbpasswd -a xxx
where xxx is your username.
Then type your password twice, and restart samba by typing:
sudo service smbd restart
We can connect our computer to our Raspberry Pi directly from Finder: Go > Connect to server > smb://xxx.xxx.xxx.xxx (the IP address of your Raspberry Pi) and enter the username and password we have just chosen. A small icon with the corresponding IP will appear in the sidebar of your Finder window under 'Locations'. This is where we can manage the contents of our Raspberry Pi.
Removing Pulseaudio and installing ALSA missing packages:
Another thing we might want to do is remove Pulseaudio. The reason for this is that Pulseaudio conflicts with both Audio-Injector Octo and Jack, and we don't really need it in our workflow.
To uninstall Pulseaudio we can type:
sudo apt-get remove pulseaudio pulseaudio-utils
sudo apt-get autoremove
It is also useful to replace the functions of Pulseaudio with some of the ALSA utilities available:
sudo apt-get install alsa-base alsa-tools alsa-tools-gui alsa-utils alsamixergui libalsaplayer0
Then:
sudo reboot
Installing Audio-Injector Octo:
Now we will proceed to the installation of our Audio-Injector Sound card.
To install Audio-Injector Octo we can go to Audio-Injector’s GitHub and follow the instructions for the Easy Automatic Setup, which consists of downloading the installation .deb package available at this link and installing it from the terminal with the following command line:
sudo dpkg -i Downloads/audioinjector.octo.setup_0.4_all.deb
We can now control if the audio interface shows up in our system checking these four entries in our terminal:
aplay -l
aplay -L
arecord -l
arecord -L
aplay-l/ arecord-l and aplay-L/ arecord-Lshow respectively the soundcards and digital audio devices currently installed, and the PCM’s (Pulse Code Modulation) defined for playback and recording purposes. If audioinjector-octo-soundcard shows up in all of them, the installation of the soundcard is complete and successful.
To see if our sound card is recognized on boot, we can type the command dmesg in our terminal. This will print the message buffer of the kernel during the boot process and show all the found devices. dmesg | grep audio will help isolate the bits of dmesg containing audio related information.
Sometimes it can happen that the soundcard is not recognized and error messages can pop up, such as the following:
audioinjector-octo soc:sound: snd_soc_register_card failed (-517)
According to a few entries on the Audio-injector forum, the solution to this is forcing the loading of the modules in a certain order creating a config file:
Sudo nano /etc/modprobe.d/audioinjector-octo.conf
That contains this bit of text:
softdep snd_soc_audioinjector_octo_soundcard pre: snd_soc_cs42xx8 snd_soc_cs42xx8_i2c
We tested the status of the sound card after some reboots and it appeared to be stable. We can also check the status of the different inputs and outputs by typing alsamixer in the terminal and selecting the Octo soundcard with F6.
It is also possible to use other audio interfaces on Raspberry Pi, the following are recognised 8-channel class compliant audio interfaces known to work on Raspberry Pi:
- ESI Gigaport eX
- Behringer UMC1820
- Behringer Firepower FCA610
- M-Audio M-Track Eight
- PreSonus AudioBox 1818VSL
Installing Pure Data from the terminal:
Pure Data will be the main programming language we use for Ambisonics on Raspberry Pi, especially for encoding and processing in the Ambisonics domain. For decoding we will mostly use AmbDec.
To install Pd, open the terminal and type
sudo apt install puredata
Once the installation process is complete, we can start using the software immediately. Pure Data will ask for permission to create a folder. Then we will want to check the Path and Startup tabs in File > Preferences > Path and File > Preferences > Startup to see the various externals and their directories once we have installed them. Deken works fine on Raspberry Pi and we can use it to find some of the external libraries we need. To work with Ambisonics we need the following libraries:
cycloneiemlibiem_ambiiemmatrixggeeGemzexy
cyclone and zexy can be downloaded and installed directly from Deken (Help > Find Externals). Just make sure you install Cyclone v.0.5-6, as the latest one is not compatible with Pd 0.51-4, which is the latest version available for Raspberry Pi. The rest of the libraries need to be installed from the terminal using the following command lines:
sudo apt-get install pd-iemlib
sudo apt-get install pd-iemmatrix
sudo apt-get install pd-iemambi
sudo apt-get install pd-ggee
sudo apt-get install gem
As in any other operating system, in Raspberry we have to define in the path and startup preferences windows the libraries we have just installed.
File > Preferences > Path > New: here we must find the folders of each of our external libraries.
File > Preferences > Startup > New: here we must enter the name of each of our external libraries.
In our startup window we will also add -jack to the startup flag line, this will ensure that Pure Data is set to work with jack and see it as output.
Install Jack and AmbDec
Now we need to install Jack and AmbDec. JACK Audio Connection Kit is an audio server that allows us to route audio signals between different software applications and to hardware units. Basically, it will allow us to connect Pure Data to AmbDec and AmbDec to the audio interface.
To install Jack, we can use the following command line:
sudo apt-get install jackd2
We can access Jack's settings by typing qjackctl in the terminal window, this will start Jack with its GUI.
AmbDec is an Ambisonics decoding software. It receives B-format Ambisonics and passes it through a filter matrix that we can import from the Ambisonics Decoder Toolkit, which provides decoded Ambisonics audio. It allows dual-band decoding and includes a wide range of decoding options, including AllRad.
A full description of AmbDec and how it works can be found at this link.
The only outdated part of this guide is the installation part. In fact, you won’t need to install AmbDec from source. It comes in a package that we can install from our terminal with the following command:
sudo apt-get install ambdec
Setting up an audio network with Pure Data, JACK and AmbDec:
Now all we need to do is use JACK to connect Pure Data to AmbDec and route the output to our audio interface. From Terminal, we can launch the JACK control GUI by typing qjackctl. JACK should automatically start the server and recognise the audio interface.
Now we can start Pure Data. From the File > Preferences > Audio window we can select JACK as our input and output devices and choose the number of channels (we can go for 8). We can then start AmbDec from the terminal by simply typing ambdec. Once AmbDec is started, we need to import a decoder matrix into it: the matrix will be the .ambdec file produced by the ADT in Octave. AmbDec already knows by default that it is going to get sound in and out of JACK.
Finally, back in JACK, we just need to open the Patchbay tab or the Graph tab, depending on whether we prefer a more or less graphical representation of our routing, and connect the output of Pure Data to the input of AmbDec, and the output of AmbDec to the playback input of the system.
With this last section, we have everything we need to successfully work with Ambisonics on Raspberry Pi. Be sure to share this guide with others, and drop me a line to report any bugs or changes in procedure so that we can keep this guide useful and up to date.
Appendix 1: Tuning your Raspberry Pi 4 for audio work.
If you are working with audio on a Raspberry Pi, and especially if you prefer to work with SuperCollider rather than Pure Data, you need to read Mads Kjeldgaard's `Notes for setting up a Raspberry Pi 4 for audio work. Mads is a reference in the SuperCollider world, especially as he was responsible for setting up the SuperCollider Meetups at Notam, Oslo. Of particular interest is the section called “Tuning the system” where he deals with real-time priority and CPU frequency to improve the performance of our system when working with audio. We have decided to publish his script here. Please be aware that this will change config files on your system, so use it at your own risk and only on a fresh Raspbian installation.
Full script:
#!/usr/bin/env sh
# Install utils for cpu freq
sudo apt-get install cpufrequtils
sudo cpufreq-set -r -g performance
sudo echo "ENABLE="true"
GOVERNOR="performance"
MAX_SPEED="0"
MIN_SPEED="0" " | sudo tee -a /etc/default/cpufrequtils
# Install other useful tools
sudo apt-get install htop git perl vim
# Set CPU governor
sudo sed -i 's/exit 0/sudo cpufreq-set -r -g performance/g' /etc/rc.local
sudo echo "exit 0" | sudo tee -a /etc/rc.local
# Set realtime priority and memlock
sudo echo "
@audio nice -15
@audio - rtprio 90 # maximum realtime priority
@audio - memlock unlimited # maximum locked-in-memory address space (KB)
" | sudo tee -a /etc/security/limits.conf
# Set swappiness
# This setting changes the so-called swappiness of your system,
# or in other words, the moment when your system starts to use its swap partition.
sudo echo "
vm.swappiness = 10
fs.inotify.max_user_watches = 524288
" | sudo tee /etc/sysctl.conf
Appendix 2: Install ceammc / Hoa lib
Developed by the Moscow Conservatory Centre for Electronic Music, ceammc is both a fork and a library for Pure Data, containing many very useful objects and GUIs, including hoa: a special package for Ambisonics work. It is a very user friendly but quite complete package, but it only works with two-dimensional Ambisonics.
You can download and install the ceammc library on Windows and MacOS by searching for *hoa* on the deken. On Linux and Raspberry Pi, the process is a bit more complex, and the package seems to be available only in developer mode and does not yet include the hoa package. However, we are still including a guide on how to install this library in this guide, as we have seen some progress on ceammc's GitHub and we believe some updates are coming soon.
Ceammc is released as a Snap. Snaps are applications packaged with all their dependencies and must be installed directly from the Snap Store. We can still install it from the command line using the using command:
sudo apt update
sudo apt install snapd
sudo snap install core
This command line will install Snap. After that we need to reboot the system:
sudo reboot
With Snap installed, we can proceed to install ceammc:
sudo snap install pd-ceammc
The Ambisonics objects contained in ceammc are those originally developed in the hoa library by CICM. The library is unfortunately not maintained any longer, and not supported by current versions of Pd.
Appendix 3: acre and acre_amb
Acre_amb is a set of useful Pure Data abstractions developed by IEM, based on the iem_ambi library, so they also use SID channel numbering and are perfectly compatible with that workflow. They depend on acre, which needs to be downloaded and can be downloaded via deken. Acre does not seem to load when we add it to the list of libraries in the startup preferences, according to the release page, the best way to use acre is to define the path of the library in your main patch.
[declare – stdpath acre] See: https://git.iem.at/pd/acre
Acre_amb can be downloaded at this link https://git.iem.at/pd/acre-amb and does not need to be installed.
Appendix 4: [vstplugin~]
One of the easiest and most convenient ways to work with Ambisonics on Pure Data has proven to be loading VST Plugins on Pd using the [vstplugin~] object. It is not officially available for Raspberry OS, yet but we have decided to make tutorials for it anyway because it will soon be released for Linux too.
OAT 04_SETTING UP A RASPBERRY PI